Friday, January 28, 2011

Cinnamon Chocolate Chip Muffins

Delicious with a chocolate twist, these muffins can be used for breakfast or as a snack.  They are also easy to freeze, so you can make lots now and freeze them for later.  Makes life lots easier when you have 'grab' foods available for when you are on the go.

Cinnamon Chocolate Chip Muffins

1/2 cup Coconut Milk or Cream
1/2 large Lime or Lemon, Juice
* * * * 
1/2 cup ground Flax Seed (grind in a coffee/spice grinder)
1/2 cup Rice Flour
1/2 cup Amaranth
3/4 cup Sorghum
3 tsp Baking Powder
1 tsp Baking Soda
1 1/2 tsp Xanthan Gum
1/2 tsp Salt
1 TBSP Fresh Ground Cinnamon (cinnamon stick ground using
       Coffee/spice grinder, you can use 1 TBSP pre-ground if
       you do not have a cinnamon stick)
* * * *
1/4 cup Butter
1/4 cup Honey
1/2 cup Brown Sugar
1/4 cup Rice Milk
1 cup mashed roasted Pumpkin or other winter
        squash, sweet potatoes, bananas, applesauce, mango etc.
        with excess liquid removed (My favorite is Butternut or
        Acorn Squash)*
3/4 cups Pecans
1/2 - 3/4 cups Chocolate Chips

*to roast a squash/pumpkin, slice in half long ways and place face down on a baking tray .  A medium sized Butternut Squash takes about 1 hour 15 minutes.  An average sized Acorn squash takes about 50 minutes.  When it is finished you should be able to scrape the meat from the skin with a spoon. If you are in a time crunch, you can use canned pumpkin.   

1) Mix 1st list in large cup and set aside; you can set it aside for up to 12 hours or as little as the time it takes you to follow this recipe.  What it will be doing is becoming 'live' increasing enzymes and good bacteria naturally.
2) Mix 2nd list, dry ingredients, in Large bowl and set aside
3) In medium bowl combine 3rd list and then add 1st and 2nd mixtures all at once.  Mix well til combined, do not over mix.
4) Bake 375 for 25 minutes in preheated oven.  When they are done baking you should be able to push on them with your finger and bread will bounce back without leaving an impression.

**Makes 15

Monday, January 24, 2011

Chocolate Coconut Macaroons


Inspired by a Lady's best friend! Mostly everything is just better with chocolate.  Hands down.  


Chocolate Coconut Macaroons


1 1/2 Mashed Bananas, Small-Medium sized (or 1 egg + 1 egg white)
2/3 cup Sugar
1/4 tsp Salt
1 tsp Vanilla
1/4 cup Rice Flour
2 1/2 cups Coconut 
1/4 cup Unsweetened Chocolate Powder
1/3 cup Melted Semi-Sweet Chocolate Chips 


Thoroughly mix first 4 ingredients in Medium sized mixing bowl. Then add Rice flour, chocolate powder, & Coconut and mix until well combined. Finally add melted chocolate.  Drop on to cookie sheet in tablespoon drops shaped in a ball. Bake 325 for 15-20 minutes. Then raise temperature to 350 for an additional 5-10 minutes until golden.

Saturday, January 22, 2011

The Wright White Chili

This recipe comes from one of our Gluten Lovers,  who got it from friend, who probably got it from another friend.  The good news is that they all ate this Gluten Free chili and did not die!  So our way of life really could not be all that bad!!  :-)  Overall, it is really good stuff!!  (picture to come soon)


The Wright White Chili


1 - 12.5 oz can of Turkey or Chicken (broken/shredded up)
1 - can Cream of Chicken Soup Substitute
3 - cans Northern Beans
2 - cans or small bag Corn
1 - can Chicken Broth
1 can Green Chiles
1/2 Onion chopped
1 tsp Dry Oregano
1 tsp Minced Dry Garlic
1 tsp Onion Powder
1 tsp Dry Chives


Combine liquids in Crockpot first, then put all other ingredients in the Crockpot with the Turkey/Chicken on bottom. Crock pot on high 3 hours.   When time is up, turn off Crockpot, mix in 1 1/2 cups Non-Dairy sour cream and serve.

Friday, January 21, 2011

Pizza!!


This post comes as a request from EveryDayAllergy.com.  So pizza lovers, thank them for making the request!  


Pizza Crust

2/3 cup Rice Flour
1/3 cup Sorghum Flour
1/4 cup Potato Flour
1 1/2 tsp Guar Gum
1 tsp Salt
2 tsp Gelatin
1/2 tsp Baking Soda
1 tsp Baking Powder
*  *  *  *  
1 1/2 tsp Yeast*
1/2 TBSP sugar
1 TBSP + 2 tsp Warm Water
*  *  *  *
2 Eggs, Room Temperature
**2/3 cup Soda Water, Room Temperature
1 TBSP Vegetable Oil

*If you have a yeast allergy or prefer to use starter in place of yeast, remove yeast along with 1/4 cup water and 1/4 cup flours and replace with 1/2 cup starter. Make a note that starter adds a sourness to your baked goods (quite sharp compared to commercial sourdough bread) and will affect the final taste of baked goods.  Plain recipes like pizza dough or rolls are flavored very strongly by it, so I do not recommend it unless there is a medical reason.

1) Combine 1st list/Dry ingredients in a medium bowl
2) Combine 2nd list in a cereal bowl or cup and set aside until frothy
3) Combine 3rd list/Wet ingredients in a large bowl and mix well.  Add 1/2 of the Dry ingredients and mix well followed by the yeast mix also mixing well.  Finally add the remaining of the dry ingredients and mix well.
4) Use two 9 inch cake pans or a large deep dish pizza pan (relatively 13-16 inches diameter) ; press or roll out in pan. Let rise in a warm oven for 30 minutes.  Then Bake 375 for 20 minutes.
5) Freeze or refrigerate in a large ziploc bag or use right away.

When you use it be sure to brush oil over the the crust first to prevent the tomato sauce from making it soggy. 

          Oiled 15" pizza crust

Non-Dairy Cheese: If you are using soy based Non-Dairy cheese (like Vegan Gourmet), you will likely need to heat the oven to 450 or higher to get the cheese to melt, so in this case, cover the entire top with the sauce and fixings to prevent the outer edge from burning. For high temp non-Dairy cheeses, the pizza is done when the cheese is melted.  If you still have difficulty with the edges burning, arrange tinfoil over and around the outer edge, though not touching the edge, before baking. 

Milk Based Cheese: If you don't need to use non-dairy cheese you will likely only need to heat the oven to 350 or 375 to cook the pizza.  Bake about 12 minutes for cake pan sized pizzas or 15-17 minutes for the larger deep dish sized crust.

Cream of Chicken Soup

Cream Soup Substitute

This recipe is a very flexible recipe and can be used in any recipe that is calling for a cream soup.  Depending on the type of cream soup you are needing you can change the broth.  Chicken broth for cream of chicken soup, Beef broth for things like my Beef Stroganoff, Vegetable or Mushroom broth for cream of mushroom soup.  There literally are no limits for this recipe and it will open up a variety of possibilities for your gluten and dairy free cooking abilities.


2 TBSP Starch (Arrowroot, Potato, Corn, Tapioca)
2 TBSP Rice Flour
2 TBSP Potato Flour
2 cups Broth
2 TBSP Non-Dairy Sour Cream
1-2 TBSP Chicken Bouillon/Herb OX (If your broth is already seasoned/salted, you likely won't need this)


Put tapioca, rice flour, and 1 cup broth in a ziploc baggy, seal it and mix.  When no lumps are present put it in a small pot with the other cup of broth and turn stove on high. While continuously stirring, sprinkle in the potato flour. Keep stirring.  When mixture has some bubbling from boiling, turn down to medium-low. Stir until thickening begins.  When the mixture begins to thicken remove from stove and continue stirring until uniformly thick.  Add Bouillon and Sour Cream according to the taste desired.

Wednesday, January 19, 2011

Chicken Enchiladas


Here we find ourselves in the Mexican Kitchen!  Like I said before, Mexican food was made for us Gluten Free folk.  Honestly, It keeps our lives a bit more simplified and allows us to eat things that are sooo normal and very tasteful.  Really, you could have people over and feed them this and they would not know you were Gluten Free unless you chose to tell them.

Chicken Enchiladas

18 Corn Tortillas
4 boiled and chopped chicken breasts
24 oz Tomato Sauce
16 oz your favorite kind of Salsa
1 1/2 cups shredded non-dairy cheese

1) Mix together tomato sauce and salsa
2) In a 9 x 13 inch pan layer 6 tortillas, 1/3 chicken, and 1/3 Salsa mixture.  Repeat one more time. And finish with a layer of the final 6 tortillas
3) Mix remaining chicken and salsa mixture and pour over final layer of tortillas.
4) Cover with foil and bake 350 for 20 minutes.  Remove foil layer with shredded non dairy cheese and return to the oven for about 10 minutes or until cheese is melted.

Tuesday, January 18, 2011

Coconut Macaroons


I created this recipe on a last minute whim not only for my children, but also for a child who was allergic to eggs. It was couple days before a children's activity for church, when I heard the child could not have dairy or eggs.  I don't like the idea of a child having to skip out on treats because of allergies.  So I selected the cookies I was making for my children with this child in mind too.  I decided that I would try Coconut Macaroons using bananas as a substitute for eggs.  If you think about it, bananas are a great substitute for these tropical cookies!  I was amazed by the result!!  They were very tasty and looked just like any other home made coconut macaroons.


Coconut Macaroons


2 Mashed Bananas, Small-Medium sized (or 2 eggs)
3/4 cup Sugar
1/4 tsp Salt
1 tsp Vanilla
1/4 cup Rice Flour
1/4 cup Tapioca Starch
2 1/2 cups Coconut 


Thoroughly mix first 4 ingredients in Medium sized mixing bowl. Then add Rice flour and Coconut and mix until well combined. Drop on to cookie sheet in tablespoon drops shaped in a ball. Bake 325 for 15-20 minutes. Then raise temperature to 350 for an additional 5-10 minutes until golden.

Monday, January 17, 2011

Yeast Free Bread Starter


There are not too many ways out there to make your bread rise.  You can probably count the ways on your fingers.  When I heard a fellow Gluten Free friend used predominantly quick breads because of a yeast allergy, I decided I was going to find a suitable method to put a rise back in Gluten and Yeast Free breads.  After all, Gluten Free breads can sure use a lift!

I learned all I could about yeast free starters.  I learned alot of very interesting information.  They are very healthy.  Did you know that Dry Yeast is acidic, but the yeast free starter is alkaline?  People whose bodies are an acidic environment bread disease and illness, like Cancer. An alkaline body is healthy and disease cannot thrive there.  Yeast free starters also flourish with natural probiotics and enzymes which assist in digestion and help the immune system.  The most important piece of information I read was any grain could be used to make it. Which meant IT COULD be Gluten Free.


Every Gluten free post had a very complex recipe for making their starter and most of them required multiple ingredients and most required milk ingredients.  I could not believe the extra stress and work that these individuals went through to get their 'starters'.  After reading their posts, I felt like it would likely be a long haul.

After learning, I sought out to make one.  I used Oatmeal first and it was a flop.  FLAT out.  Did. Not. Work. Simply put!  I thought it did not work because oatmeal loses some of its natural qualities once it is rolled (the hull falls off), hence not TRULY a 'whole' grain. I chose not to try any starches, because they are starches; no protein. So is it really a whole grain?.  I felt since starch is only a piece of say, wheat or sorghum, it would likely flop just as bad as the oatmeal. I also used my oven, which could have been too warm and prevented it from growing.   So my second attempt I tried Sorghum on the counter while in a sub zero climate outside.  BEAUTIFUL!!  And EASY!  Seriously, all you need is a place free of drafts, a container, water, and some whole grain flour.

Yeast Free Starter

To start:
1 cup Sorghum Flour (or other whole grain flour)
1 cup water
1 container (I use a quart sized canning jar, you could also use a 1 gallon ziploc bag)
**Do not use any metal components (jar lid is OK), metal will kill it.

1) Combine ingredients in your container and set in non drafty/warm area in your kitchen (not in stove). It needs to breath, so if you are using a lidded container, leave it slightly open.  I just don't twist my jar lid all the way shut.  If you are using a peanut butter or mayo jar, poke a hole in the lid. Mix every 12 hours (I just gently shake mine in its jar.  If you choose to do this, make sure you close the lid all the way before shaking). 
2) At the end of its first 24 hours, you need to feed it.  Pour out half (or put half in another container to have two times as much, or give away to a friend once alive).  Feed the starter by adding 1/2 cup flour and 1/2 cup water. Mix well and let sit, stirring every 12 hours.
3) At the end of 48 hours it may appear spongy and smell yeasty or beery.  This is great! you are live. Live or not, we need to feed it again.  So again, pour out half and add 1/2 cup flour and 1/2 cup water.  Mix well and set aside, stirring every 12 hours.
4) After feeding it one time while it is 'alive', you can leave it on the counter. On day 5 of being alive, you can refrigerate it to prevent it from 'growing' anymore, use it in a bread, or just feed it. If refrigerating it, feed it only 1/2 cup flour and a 1/2 cup water.  If using it in a bread, feed it 1 cup of each before adding it to your bread to replenish what you use. 
5) IF YOU HAVE DIFFICULTY starting the starter, then add the juice of 1 or 2 fresh grapes to the water and flour.  Don't put the grape in it, it will likely mold.

- At day 5 You don't have to dump out half anymore unless you don't want that much.  It is strong enough now, that it will hold through its feedings.
- On day 10 it is ready to be used in an Amish Friendship Bread.
- At one point, the sponginess appearance will go away and you will feel like you killed it.  Keep it, more than likely you did not kill it.  After about 12-24 hours you will see swamp-like bubbling has replaced the sponginess.
- It is VERY hard to kill this stuff.  The only thing that can kill it is a high temperature.  Like the temperature of the oven when you bake it in your bread.  So even if you forgot to feed it, it is more than likely still alive, so just feed it when you remember to.
- Just keep mine on the counter and use it every 5 days for regular breads.  This way I don't have to worry about a faulty rise from a dough that was too cold.
-The smell will vary.  I notice it smells more yeasty after doing a feeding for Amish Bread, because of the sugar used.  While when I use it for regular bread and do not feed with any sugar the smell is not so much a yeasty smell.  If the smell gets too strong for you, then pour out the liquid that forms on the top and replace with an equal amount of water.  I just started to do this.  On the same day I am going to feed the starter and use it for bread, I will change the liquid before feeding.

Sunday, January 16, 2011

Amish Friendship Bread


In college I was good friends with a lady who made Amish Friendship all the time. It was one of the most delicious breads I had ever tasted!  I must say it really got my attention when I found out the beginning of its existence was filled with days of sitting out on the counter.  Sounded more like a biology experiment to me than making a bread as wonderful as Amish friendship bread.

I love Amish friendship bread, so of course I thought I might try to create a Gluten and Dairy Free equivalent. Oh, as a bonus, it is also yeast free! Thankfully I can report to you today that it was highly successful, delectable, soft, and every bit as good as its wheat counterpart.  Of course, I am more than happy to share the recipe with you!


Amish Friendship Bread


Your starter has just been mixed with equal parts flour, sugar, and water.  Use 1 cup of the starter for this recipe, save 2 cups to give to 2 friends along with this recipe, and keep the final cup for yourself. (This is day 1 for the final cup.  On days 2-4 stir with a wooden spoon.  On Day 5 add 1 cup each of Sugar, Flour, and Water.  On days 6-9 stir with a wooden spoon.  On day 10 add 1 cup each of Sugar, Flour, and Water and make bread again.)  This recipe can also be used by wheat lovers too, just using wheat flour in place of the other flours and omit the guar gum & gelatin and reduce soda by 1/2 tsp.  So don't hesitate in giving it to non-gluten free people.


1 cup Starter
*  *  *  * 
1 cup Oil (I like using 2/3 cups pumpkin or Butternut squash 
                 and 1/3 cup oil.  Subbing all the oil with pumpkin 
                 seems a little too moist and almost gummy)
1/2 cup Milk (I use rice milk)
3 Eggs
1 tsp Vanilla
*  *  *  *
2/3 cup Sorghum
2/3 cup Tapioca Starch
1/3 cup Rice Flour
1/3 cup Amaranth Flour
1 cup Sugar
1 1/2 tsp Baking Powder
1 tsp Baking Soda
2 1/2 tsp Xanthan Gum

2 1/2 tsp Gelatin
2 tsp Cinnamon
1 (5.1 oz) box of Vanilla Pudding (I use the Jell-O brand Fat and        Sugar Free,  B/C it is gluten and dairy free)
1/2 tsp Salt
1/2 cup Chopped Pecans or Walnuts (you don't want halves or it will make it tough to slice)

1) Mix all wet ingredients (1st list) in medium Bowl
2) Mix all dry ingredients (2nd list) in a separate bowl
3) Add Starter to the wet ingredients mix, and then add dry ingredients and mix well.
4) Grease and sugar two 9 x 4 bread pans, pour equal amounts of dough in both pans, and bake 325 for 1 hour.
5) Let cool in pan on its side for 10 minutes and then remove from pan and let cool fully.

Friday, January 14, 2011

Tasteful and Healthy Bread?! Really!


After an oven fiasco that came as a result of a move, I have modified my Healthy Loaf and it is more appealing than ever!  Have I told you yet how much I love this loaf?!  Really, my kids too!  The moment it comes out of the oven they mull over it like hawks on fresh prey!  One day my 18 month old walked into my room gnawing on a half loaf. . . A HALF LOAF!! I suppose he wanted some?  :o)  But of course, why wouldn't he?  It has a great flavor!  

So let's talk about what sets this loaf aside from other loves out there.  First, it was my first bread creation.  As I became familiar with the ingredients of the typical Gluten and Dairy Free loaf, I discovered there really was no nutritional content in the breads that were most visually appealing. Is that ridiculous?  Are we really so dense that we need to give up nutrition for visual appeal?   Isn't the reason why we all turned to gluten free living, for the purpose of our health anyway?  That is, for one reason or another, we cannot eat these proteins and have chosen to protect our bodies by eliminating them from our diet.  Why then would we choose to accept a less than nutritious bread as a staple of our diet?  That just does not make sense now, DOES IT?  Well, I did not think so.  

All the store bought breads were typically Tapioca Starch or Rice Flour or other starchy based flours.  They were missing essential nutrients that were so easily found in Wheat, like fats and protein.  So I sought out replacements for these elements.  Flax took the seat for the fats because of its Omega 3 boost; and we all know our society is crying out for sufficient Omega 3's.  Wild rice was the winner for protein, it was the purest and most potent of all grain.  It is said Wild Rice is so nutrient dense (protein, vitamins, and minerals) that 1 pound can feed thirty!!  How's that fact for a tremendous superfood?! (Read Here)

A fellow health nut and friend of mine gave me a simple tip to reduce the graininess that is sometimes present in whole grain breads and quite prominent in Gluten Free baking.  Believe it or not her class was for a whole wheat, but I was able to learn and apply it to Gluten Free baking too.  She used the technique to keep her doughs soft enough so that it felt like you were eating breads  and other baked items made of white flour.  She let her dough set out over night.  I only left my dough to set for an hour or so. By doing this, the whole grain softens as it begins to break down.  (It also adds nutrition to the loaf as enzymes and pro-biotics increase through the time it is left to sit; these elements are very helpful for a body worn with Celiac, because they aid in digestion)  So though this recipe does have two rice flours and whole grain flax in it, you won't even know it taking a bite!

Delicious and Healthy Loaf

1/2  cup Rice Flour
1/4 cup Fresh Ground Flax
1/4 cup Fresh Ground Wild Rice Flour
2/3 cup Coconut Cream or Milk
1/4 cup Rice Milk
2  Tbsp Apple Cider Vinegar
1/3 cup Honey or Agave Nectar
*  *  *  * 
 1 TBSP yeast*
3 TBSP warm water (not hot)
2 tsp sugar
*  *  *  *

5 beaten Eggs
1 Tbsp Xanthan Gum
2 tsp Gelatin
2 tsp Cinnamon
1 1/2 tsp Baking Soda
1 TBSP Baking Powder
2 tsp Salt
1/4 cup Sugar**
1  3/4 cup Sorghum Flour
1/2 cup Tapioca Starch
1/2 cup Amaranth Flour
*  *  *  *
2   cups of one or many of the following purees-- baked 
sweet potato, roasted pumpkin, roasted butternut squash,  
roasted acorn squash or bananas, applesauce, mango, etc. 
(I prefer the vegetables over the fruits)


Take care that all ingredients are at least room temperature at the time you are preparing to bake the bread.  A few hours before making it, I put the cold ingredients like eggs and perhaps the vegetable puree in the oven.  You want to try to avoid having any ingredients going strait from the fridge to the mix. Being gluten free, a successful rise will depend highly on warm conditions.


1) Mix 1st group in Large bowl and let set for at least 4 hours (overnight or all day is best).  
2) Mix 2nd group in small cereal bowl or cup and set aside until thickens
3) Mix dry ingredients of 3rd group in medium bowl and then add the wet ingredients to the 1st/overnight mixture.
4) When yeast mixture is bubbly and thick, combine mix 2 & 3, along with the fruit/vegetable puree, with 1st mixture. 
5) Pour into two 9x4 or 9x5 bread pans*** and let rise in warm oven for 30 mins
6) Remove from oven to preheat and bake 375 for 30-35 minutes and then cover with tinfoil (don't let it touch the bread) and bake additional 10-15 minutes.  I check done-ness with a skewer the same way you may check other baked items with a toothpick.  
7) Remove from oven and let cool on its side for 10 minutes.  For thicker crust return loaf w/o its pan to the oven for 10 more minutes.  

*If you prefer not to use yeast, you can substitute 1 1/3 cup starter. Just remove the yeast along with a 2/3 cup liquids and a 2/3 cup sorghum flour if using sorghum starter. If not, I recommend reducing multiple flours rather than taking from only one. 

Tuesday, January 11, 2011

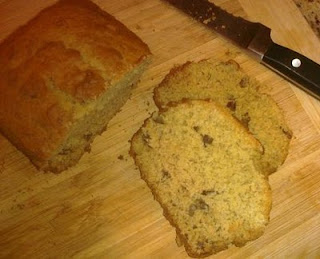
Banana Bread


Another Gluten and Dairy Free take on another wonderful comfort food!  Who could live without Banana Bread?!  Banana Bread was one of the most frequently made in our home growing up next to chocolate chip cookies and brownies.  I created this recipe keeping in mind the Betty Crocker recipe I loved as a child.


Banana Bread


1/3 cup Butter or Shortening
1/2 cup Brown Sugar
2 Eggs
1/2 cup Sorghum Flour
1/2 cup Tapioca Flour
1/2 cup Amaranth Flour
1/4 cup Rice Flour
1 1/2 tsp Baking Powder
1 tsp Baking Soda
1 tsp Gelatin 
3 tsp Guar Gum
1/2 tsp Salt
4 Medium Mashed Bananas
1/2 cup Chopped Pecans or Walnuts (optional)


Mix all wet ingredients (except bananas) well. Mix all dry ingredients in separate bowl then add them slowly to the wet ingredients. When mostly combined add bananas and mix thoroughly.  If you choose to add pecans or walnuts, stir them in now.


Bake 350 for about 40-50 minutes.  I use a skewer and make sure it comes out about clean.  Remove from oven rest pan on side for 10 minutes, then take out of pan and let cool fully before cutting.

Monday, January 10, 2011

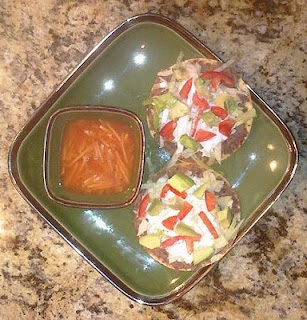
Tostadas and Fideo: Easy Peasy!


Tostadas.  The name says it all- again we are eating south of the border tonight!  For those of you who have never had or seen a Tostada, it could be described as a Salad on a large round tortilla chip, though the meal is far more complete than a salad.  When my husbands family eats tostadas, they usually have a simple soup with it too, called Fideo. Fideo is usually made with a bouillon tomato broth, however, these powdered mixes usually  have gluten and dairy in them, so I make it from scratch.

This makes for a fast and easy dinner at the last minute as long as you have all the necessary ingredients.  This recipe feeds 3-5.

Tostadas, you will need:

12 corn tostadas
2 Avocados (sliced thinly or diced)
1 large tomato (sliced thinly or diced)
1/3 head of lettuce, chopped
1/2 onion chopped (optional)
1- large can refried beans (or 3 cups homemade refried beans)
3 chicken breasts cooked and well chopped OR 
                1 pound cooked ground beef
Crema - 1/3 cup non-dairy sour cream mixed in blender with 
                 1/4 cup rice milk (consistency should like honey)

When all preparations have been completed, layer each tosatada shell in the following order:
1) Spread with refried beans (not too thick)
2) 2-3 TBSP chopped chicken OR ground beef
3) Lettuce (and onion if you choose)
4) 1-2 TBSP 'crema'
5) Tomatoes and avocados

Fideo:

4 oz tomato sauce
1 16 oz can chicken broth
6 cups water
1 tsp onion powder
1/2 tsp garlic powder
6 oz Gluten Free angel hair pasta broken in 1-2 inch pieces
Salt to taste

1)  For the broth, combine first 5 ingredients in pot and bring to boil.
2)  In separate pot cook pasta until ready.
3) When Pasta is ready drain and add to broth.

You could choose to cook pasta in the broth, but I choose not to because gluten free pasta leaves a residue in the broth.  


Friday, January 7, 2011

Dinner Rolls or Biscuits

It bewilders me as to why these rolls are SO good though they are so dark in color.  Wheat is such a different story.  With wheat the darker the flour or bread the less appealing the flavor and usually texture too.  However, with these rolls, as dark as they are, the taste is a beautiful thing!!  

You can take care in forming the balls of dough to create a smoother round ball for dinner rolls or you can just put random globs of dough on the pans to make a biscuit.  A very flexible recipe.

Dinner Rolls or Biscuits

1 cups Sorghum Flour
1 cups Oatmeal, ground in coffee/spice grinder
1/2 cup Tapioca Flour
1/4 cup Flax, ground in coffee/spice grinder
1/4 cup Sugar
1 TBSP Guar Gum
1 tsp Gelatin
1 tsp Salt
1 tsp Cinnamon
1 1/2 tsp Baking Soda
*  *  *  *
3 tsp Yeast*
2 TBSP warm water
1 tsp sugar
*  *  *  *
1/2 cups Butter
1/2 cup Rice milk
1/3 cup Water
2 TBSP Apple Cider Vinegar
1 Egg, beaten
*  *  *  *
2 cups Puree (Pumpkin, Butternut Squash, Sweet Potatoes, Applesauce, Bananas, Mango, etc)  

1) Combine all dry ingredients (1 st group) in medium bowl
2) Combine 2nd group of ingredients (for yeast mixture) in a small cereal bowl or cup
3) Combine all wet ingredients (3rd group) in a large bowl.
4) When yeast mixture becomes bubbly and thickens, combine groups 1 and 2 along with the fruit/vegetable puree in with the wet ingredients (if you use applesauce remove 1 TBSP of liquid per 1/2 cup used).
5) Let rest in warm place for 1/2 hour
6) Place in 2 inch balls on cookie sheets and bake 350 for 22-27 minutes or until you notice the color more golden in appearance.


Makes about 20.


*If you prefer not to use yeast, you can use 1 cup starter instead.  Just remove the  yeast and 1/2 cup flours and a 1/2 cup liquids. I recommend that you reduce several flours rather than removing only 1 type of flour.

Thursday, January 6, 2011

Troubleshooting: Oven Temperature, Eggs, and Liquids

In mid November I baked my first loaf of bread using a gas oven vs the electric I had used for my entire Gluten Free experience.  For the first time since starting out with gluten free baking my loaf was not nice and round on the top when it cooled.  It was beautiful in the oven and beautiful while it was warm, but when fully cooled it did not exactly 'sink', but it just got smaller, maybe less round?  Not sure how to describe it.  It bothered me some and I made slight changes in it each time a made it.  It was not until I took the loaf to a friend, who's daughter was living off that store bought cardboard stuff (sorry friend :o),  that I was bothered enough to work vigorously on fixing the problem. It was quite embarrassing to me that I was handing a less than perfect loaf to someone and it was representing me. I dumbly explained that I did not know what happened, but our gas stove does not work well with my recipes. Doesn't that sound dumb?!  Isn't an OVEN an oven? After that, I started popping out loaves of bread like it was popcorn, I baked about 10 loaves over the next 2 weeks!!  So now I share.

I had a few leads:

Everywhere I read in my need to troubleshoot it seemed it was a liquids issue.  And I thought, but we only changed ovens, why liquids, why anything to do with the bread.  Then I was clearing eggs off the table one day and realized that they had the same shrinking effect as my bread did as they cooled and I was using 4 eggs.  So I went to make the bread using no eggs, but I could not bring myself to omit the eggs and only dropped it down to two eggs.  It did get better.  I was really perplexed now, we only changed stoves, I always had this recipe and it always worked.  I knew that eggs helped with rise and prevented crumbling; I WAS SCARED TO REMOVE EGGS, SO I LEFT THEM THERE.  

Maybe I SHOULD remove liquids.  But in devising the recipe I found that liquids REALLY helped with the rise.  I also did not want to remove liquids, it was really scary.  Honestly, the whole process was scary for me!  Why couldn't I just move back to our other house and use our other oven (OK, that IS a little eXtrEmE, isn't it?!)  So I moved forward removed the yolks, because they DON'T help with much of anything, cut some liquids, and yes it DID GET BETTER.

BUT THEN I DISCOVERED THE REAL PROBLEM

We had an HVAC technician out to fix an air flow issue with our heater.  In the discussion he said that electric burns hotter than gas.  Made me think about my problem, though I could not ask him anything else.  I started searching about ovens.  I learned that not all ovens are true to their temperatures and electric ovens are more evenly heated than gas.  Then this morning I discovered that an electric oven uses dry heat and GAS OVENS USE MOIST HEAT.   Moisture to cook!!  Water!!  Unbelievable!! The gas oven was messing with my recipe and adding its own moisture to my previously perfect bread!!! (explained here thanks to Wise Geek)

PROBLEM SOLVED!!! 

Wednesday, January 5, 2011

The Perfect Basic Loaf


I was talking to a friend this morning who wanted to try my other bread recipe, but was waiting on some ingredients before she tried it.  My thoughts consumed me.  My first recipe was created completely health consciously and of course with many ingredients that the average Gluten Free kitchen does not have.  Many people who would like to try my recipe may not be motivated to buy the rare ingredients.  I needed to simplify.  So I decided to create a loaf for the average Gluten Free individual.

For the creation of this loaf I went back to the basics using only the bare necessities to conserve the quality of the loaf.  I have removed the honey, the wild rice, and coconut cream.  I was going to remove the flax and the fruit/vegetable puree, but there would be a tremendous compromise of texture & flavor which is critical in gluten free bread.  So all in all this loaf would be similar to a loaf of bread made with both white and whole wheat flours.

Basic GF Bread

1 1/3 cups Sorghum
1 1/3 cups Oatmeal
2/3 cups Tapioca
1/3 cups Flax
1/3 cup Sugar
1 TBSP Xanthan Gum
2 tsp Gelatin
2 tsp Salt
1 1/2 tsp Cinnamon
2 tsp Baking Soda
*  *  *  *
4 tsp Yeast*
2 TBSP + 1 tsp warm water
2 tsp sugar
*  *  *  *
2/3 cups Butter
2/3 cup Rice milk
1/3 cup Water
2 TBSP Apple Cider Vinegar
1 Egg + 1 Egg white, beaten
*  *  *  *
2 2/3 cups Puree (Pumpkin, Butternut Squash, Sweet Potatoes, Applesauce, Bananas, Mango, etc)  

1) Combine all dry ingredients (1 st group) in medium bowl
2) Combine 2nd group of ingredients (for yeast mixture) in a small cereal bowl or cup
3) Combine all wet ingredients (3rd group) in a large bowl.
4) When yeast mixture becomes bubbly and thickens, combine groups 1 and 2 along with the fruit/vegetable puree in with the wet ingredients (if you use applesauce remove 1 TBSP of liquid per 1/2 cup used).
5) Divide dough and place in 2 greased 9 x 4 inch bread pans and let rest in warm place for 1/2 hour
6) Bake 375 for 35-40 minutes. Then cover with tinfoil and bake for 10-15 minutes longer.


*If you prefer not to use yeast use 1 1/3 cups starter. Just remove the yeast along with 2/3 cup liquids and 2/3 cup flours.  I recommend that you remove some of several flours rather than removing just 1 type of flour.