Monday, August 29, 2011

Chocolate Cake Donuts


Even as I write up this entry, my 2 year old son is pointing at the screen wanting one of these delicious babies.  They are good, they are soooooo GOOD!!  If you have seen my other donut post, I did not go into much detail about the process to obtain a successful finished product.  SO in this post I am going to give a series of detailed pictures to let you know how to create them.  

Chocolate Cake Style Donuts

1/3 cup Tapioca
1/3 cup Rice Flour
1/3 cup Unsweetened Chocolate Powder
1/4 cup Jello Brand Chocolate Pudding 
               sugar and fat free (this one is GFCF)
1/4 cup Sugar 
1 TBSP Potato FLOUR (not starch)
2 tsp Gelatin 
1 tsp Guar Gum
1/2 tsp Xanthan Gum 
1/2 tsp Salt
1/2 tsp Baking Soda
2 tsp Baking Powder
*  *  *  *  
2 tsp Yeast**
1/2 TBSP sugar
2 TBSP Warm Water
*  *  *  *
1/3 cup Melted Butter
1/3 cup Warm Rice Milk 
2 eggs, Room Temperature

1) Combine first list of ingredients (dry ingredients) in a medium mixing bowl and create a well in the middle.
2) Combine second list of ingredients in a small cereal bowl and set aside until it has thickened.
3) Combine last list of ingredients (wet ingredients) in a small mixing bowl.
4) Once yeast mixture has thickened pour wet ingredients and yeast mixture into the well of the dry ingredients. Mix 'til incorporated and then spread dough up the sides of the bowl and let rest for 5-10 mins until the dough stiffens some what (will be tempting to skip this step, but DON'T).  You will notice it become slightly less sticky, though there will still be some stickiness to it. Using a rubber spatula, scrape dough from sides of bowl and pat into a ball.
5) For Donut holes for balls by covering your hands in plastic bags or plastic gloves and rolling dough into 3/4 inch diameter balls placing them on saran wrap as you roll them.  Fry in 375 degree oil for about 10- 15 seconds on each side to start. Start one at a time until you get a hole with the right color and internal done-ness.
6) For donuts: Divide dough into 2 parts and set one aside. Between two sheets of saran wrap sprayed with non-stick spray, roll one part of the dough into a 1/2 inch slab about 3-3.5 inches wide; a narrow strip of dough will be easier to work with. Proceed to use a 3-3.5 inch cookie/biscuit cutter (or cup with a thin lip if you don't have a cutter, I used a Coca Cola cup) to cut the slab into circles and then punch a hole in the middle using a smaller cutter or a spoon (about 1 inch in diameter).  Instead of using flour to prevent stickiness, use saran wrap sprayed with non-stick spray. Flour will cause donuts to be heavy.  It is easiest to transfer dough one circle at a time using saran wrap rather than my fingers or a spatula.  You may find it easier to pat a ball into a 1/2 inch thick 3-3.5 inch diameter circle and then just punch a hole in middle.  
7) In a deep pan, pour 2-3 inches of oil and heat to 375 if you have a thermometer.  For a 3 inch diameter, fry 20-30 seconds on first side and then flip for another 15-20 to start (you may have to adjust your times, so be sure to check the indie of your first donuts til it is right).  For 3.5 inch fry 25-35 seconds on the first side followed by 20-25 on the next to start and likewise, check doness. I always start one at a time until I get the right color on the outside and the right done-ness on the inside twice in a row.  Then 3 or 4 at a time after.
8) Dust in powdered sugar or top with your favorite frosting and sprinkles.

   
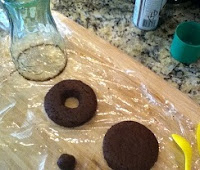
Used a Coca Cola cup for the outside circle and rolled out dough between two sheets of saran wrap sprayed with non-stick spray.

 
Transferred donut from saran wrap to a flat surface (you can use a small plate, lid, or spatula) by lifting the saran wrap (placing my hand under the donut) and tiping it onto the surface.  Once on the lid I put the donut in the hot oil by tipping the lid upside down.  Be careful at this stage to make sure you don't get splatered by the hot oil.


Tuesday, August 16, 2011

Quiche


This recipe is soo overdue!  I have wanted to post it since long before my computer crashed, but with a trip to Little Rock and Tulsa, and lots of well needed summer fun, it just did not happen. This is another of my raves in my desires to increase the amount of vegetables our family eats and also to make sure that none of our garden produce goes to waste. The most wonderful part about this recipe is that nothing is really 'in stone'.  It is soo flexible. Mostly any combination of vegetables and meats will work, so use your imagination! 

When I first thought of Quiche Gluten and Dairy Free, I felt like it was just a danger zone!  I mean Quiche without MILK?? But, really, is it possible to live without a QUICHE??!  I say it is NOT!  And quite honestly, I think I LOVE my recipe more Gluten and Dairy Free than my original recipe!  AND my boys do too!  Even though this recipe is mostly vegetables, they were fighting over the last pieces!  SOO I hope some fellow QUICHE LOVERS stumble upon this recipe and are pleasantly reunited with a fave!! 

The last time I made this, I meant to add 1/4 cup chopped fresh Basil, but I forgot 'til the Quiche was already in the oven.  SO I can't speak for the Basil yet, but I will try it next time and get back to you on it.

Quiche

1 cup Vegetables (Zucchini or mushrooms are my faves!!)
1/4 cup chopped onion (I do green w/ mushrooms or white w/ zucchini)
2 TBSP Butter
* * * *

1 TBSP Tapioca Starch
1 TBSP Rice Flour
1-2 TBSP Butter 
1/2 cup Chicken Broth
1/2 cup Rice Milk

* * * *
4 Eggs, Beaten
1/2 cup sliced lunch meat cut in 1 inch pieces (Ham w/ zuchini or Turkey w/ mushrooms)
1/2 cup Shredded Non-Dairy Yellow Cheese (I use Vegan Gourmet)
1/2 cup Better than Sour Cream
1/4 cup Rice Milk
1 tsp Salt
1/2 tsp Pepper
1 tsp Dried Minced Garlic

1) List one: Melt butter in skillet and saute veggies til soft.  About 5+ minutes.
2) List two: Act like you are making gravy. Melt butter in a skillet and add Flour/Starch stiring vigorously to prevent clumping.  Add broth continuing to stir to prevent clumps, then add milk still stirring.
3) Set aside while you combine ingredients of 3rd list in a bowl.  Then add #1 and #2 to the bowl and just incorporate.
4) Transfer mixture to a 8-9inch pie shell. (I don't have my crust recipe up yet, but I will be sure to post ASAP)
5) Bake 375 for 30-35 minutes or until knife comes out clean.  Cool 5 mins and ENJOY!!

Stuffed Zucchini Boats


I appologize for not posting for so long.  My computer was broken and I was without for almost a month. It was a near death experience :o)  I cannot live without a computer!  Lucky school was just around the corner when it broke, or else I may have been without much longer. 

I have had a desire to increase the amount of vegetables our family eats for a while, without the motivation.  With a garden in place, I decided that summer time was the perfect time to do this.  Tonights dish I was not planning on putting on the blog, but it was soo delicious I had to!  I want to be able to remember how I made this accident so I can repeat it!  The picture does not include the 'cheese' topping.

 
Stuffed Zucchini Boats

3 Medium Zucchini
1/2 pound Ground Turkey or Beef
1 cup Plain Tomato Sauce
1/2 TSP Onion Powder
1/2 TSP Garlic Powder
1 TSP Garlic and Herb Salt Free Mrs. Dash (Turqoise Lid)
1/4 cup Freshly Chopped Basil Leaves (about 20 medium large leaves)1/4 cup Chopped Pepperoni
3/4 cup Favorite Non Dairy Cheese (I used yellow Vegan Gourmet)

1) Cut the zucchini in half long ways and carve out the insides.  I tried taking out the insides using a knif first, then also with a spoon.  The spoon was much easier.  Using the spoon, I pressed it into the zucchini along the edges first, then starting atthe widest part of the back, I scooped it out. If you accidentally stick your spoon through the bottom or break a side, don't worry about it, it will still work and you won't even notice it when it is done. Set your 'boat' aside and chop the insides to about square centimeter pieces.
2) For the filling. Cook up your ground beef in a skillet and then add the chopped zucchini.  Cook for about 3-5 minutes and then add the DRY spices.  Let cook another couple minutes in the skillet. Then turn off heat and add Basil and Pepperoni.
3) Place your empty Zucchini Boats on a cookie sheet sprayed with non-stick spray. I sprayed a line for each boat.  Sprinkle salt and pepper in empty boats then fill with the filling and cover in shredded 'cheese'.  Since my husband is not  Dairy Free I used provolone cheese on his and he absolutely LOVED it!!
4) Pre-heat oven to 425 and bake 25 minutes.